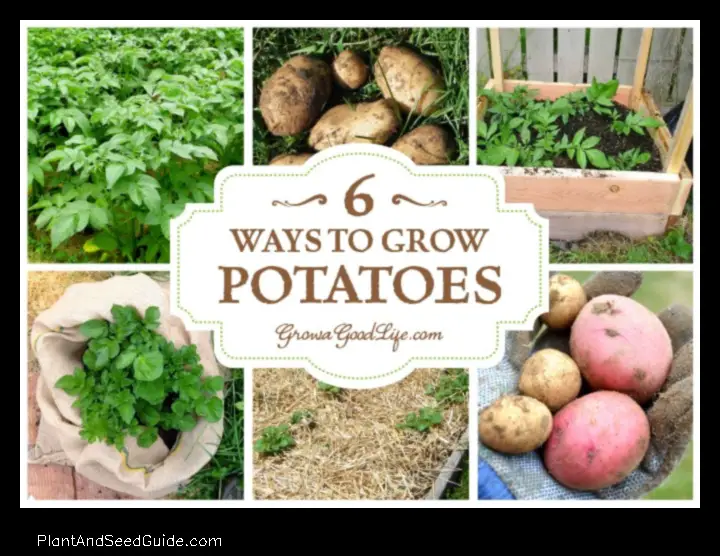
Fingerling potatoes are a type of small, thin potato that are perfect for roasting, boiling, or frying. They are also very easy to grow, and can be planted in most gardens.
To plant fingerling potatoes, you will need the following:
Once you have gathered your materials, you can begin planting your fingerling potatoes.
Choose a sunny spot in your garden that has well-drained soil.
Dig a trench about 6 inches deep and 12 inches wide.
Add a layer of compost or manure to the bottom of the trench.
Place the fingerling potato seeds about 6 inches apart in the trench.
Cover the seeds with soil and water them well.
Your fingerling potatoes will be ready to harvest in about 80 days.
Loading... Seconds Left for
Miniature Orchid Terrarium Gallery!
Here are some tips for growing fingerling potatoes:
Water your potatoes regularly, especially during dry spells.
Fertilize your potatoes every few weeks with a well-balanced fertilizer.
Mulch your potatoes to help keep the soil moist and to prevent weeds.
Inspect your potatoes regularly for pests and diseases.
With
a little care, you can grow your own delicious fingerling potatoes at home.
Feature
Description
Fingerling potatoes
A type of potato that is small and oblong, with a thin skin and a delicate flavor.
Growing fingerling potatoes
Fingerling potatoes can be grown in most climates, but they do best in well-drained soil that is rich in organic matter.
Planting fingerling potatoes
Fingerling potatoes should be planted in early spring, after the last frost.
Caring for fingerling potatoes
Fingerling potatoes need regular watering, but they should not be overwatered.
Harvesting fingerling potatoes
Fingerling potatoes are ready to harvest when the skins are tough and the flesh is firm.
IChoosing_the_right_variety">IChoosing the right variety
There are many different varieties of fingerling potatoes, each with its own unique flavor and texture. When choosing a variety, consider the following factors:
The climate in your area. Some varieties are more tolerant of heat or cold than others.
The soil type in your area. Some varieties do better in sandy soil, while others do better in clay soil.
The amount of space you have. Some varieties grow larger than others.
Your personal preferences. Some varieties are more flavorful than others, while others have a more waxy or mealy texture.
Once you have considered these factors, you can start narrowing down your choices. Here are a few popular varieties of fingerling potatoes to get you started:
For more information on specific varieties of fingerling potatoes, consult with your local nursery or garden center.
Preparing_the_soil">Preparing the soil
The soil in which you plant your fingerling potatoes should be well-drained and fertile.
If your soil is sandy, you may need to add some compost or organic matter to improve drainage..
If your soil is clayey, you may need to add some sand to improve drainage.
The ideal pH for growing fingerling potatoes is between 5.5 and 6.5. If your soil is too acidic, you can add some lime to raise the pH. If your soil is too alkaline, you can add some sulfur to lower the pH.
Once you have prepared your soil, you can begin planting your fingerling potatoes.
ing="async" src="https://plantandseedguide.com/wp-content/uploads/2024/01/How-to-Plant-Fingerling-Potatoes-A-Step-by-Step-Guide-2.jpeg" alt="how to plant fingerling potatoes" style="width:600px;height:400px;">
Planting the potatoes
Once you have chosen the right variety of potatoes and prepared your soil, you are ready to plant them.
1. Dig a trench about 12 inches deep and 3 feet wide.
2. Place th
e potatoes about 12 inches apart in the trench, with the eyes facing up.
3. Cover the potatoes with soil and water well.
4. Mulch the area around the potatoes to help keep the soil moist and cool.
Potatoes wi
ll take about 90 days to mature. When the leaves start to turn yellow and the skins of the potatoes begin to wrinkle, they are ready to harvest.
To harvest your potatoes, dig up the entire trench and carefully remove the potatoes.
Potatoes can be stored in a cool, dry place for several months.
Caring_for_your_potatoes">Caring for your potatoes
Once your potatoes have been planted, there are a few things you can do to help them grow healthy and strong.
Water your potatoes regularly, especially during dry spells.
Fertilize your potatoes every few weeks with a balanced fertilizer.
Mulch around your potatoes to help keep the soil moist and cool.
Protect your potatoes from pests and diseases.
By following these tips, you can help your potatoes grow to be healthy and delicious.
VHarvesting_your_potatoes">VHarvesting your potatoes
When your potatoes are ready to harvest, the foliage will start to turn yellow and wilt. You can also check if the potatoes are ready by gently digging up one or two of the plants. If the potatoes are firm and have a smooth skin, they are ready to harvest.
To harvest your potatoes, carefully dig up the plants with a garden fork or shovel. Be careful not to damage the potatoes. Once you have dug up the plants, brush off the dirt and store them in a cool, dry place.
Potatoes can be stored for several months if they are kept in a cool, dry place.
You can store them in a root cellar, basement, or even in a cool closet..
Make sure that the potatoes are not exposed to direct sunlight or heat, as this will cause them to spoil.
When you a
re ready to use your potatoes, simply rinse them off and cook them as desired. Potatoes are a versatile vegetable that can be used in a variety of dishes. They can be boiled, mashed, fried, baked, or grilled.
Storing your potatoes
Once your potatoes have been harvested, you need to store them properly in order to keep them fresh for as long as possible. Here are a few tips for storing potatoes:
Store potatoes in a cool, dark place. Potatoes should be stored at a temperature of between 45 and 55 degrees Fahrenheit. If the temperature is too warm, the potatoes will start to sprout. If the temperature is too cold, the potatoes will become discolored and mushy.
Don’t store potatoes in the refrigerator. The cold temperatures in the refrigerator will cause the potatoes to become mealy and tasteless.
Don’t store potatoes near onions. Onions release a gas that can cause potatoes to sprout prematurely.
Potatoes should be stored in a well-ventilated area. If the air is too humid, the potatoes will start to rot.
Potatoes should be stored in a container that allows them to breathe. If the potatoes are stored in a sealed container, they will start to sweat and rot.
By followin
g these tips, you can store your potatoes for up to six months.
Pests and diseases
Fingerling potatoes are susceptible to a variety of pests and diseases, including:
Aphids
Colorado potato beetles
Flea beetles
Potato blight
Powdery mildew
To protect your fingerling potatoes from pests and diseases, you can take the following steps:
If you suspect that your fingerling potatoes are infected with a pest or disease, it is important to take action to prevent the spread of the problem. You can contact your local extension office for advice on how to treat your potatoes.
Troubleshooting
If you are having trouble growing fingerling potatoes, there are a few things you can check.
Make sure you are planting the potatoes in the right climate. Fingerling potatoes are best grown in cool, moist climates.
Use a soil that is well-drained and rich in organic matter.
Water your potatoes regularly, but do not overwater them.
Fertilize your potatoes regularly with a balanced fertilizer.
Protect your potatoes from pests and diseases.
If yo
u are still having trouble growing fingerling potatoes, you can contact your local extension office for help.
FAQ
Q: What is the best time to plant fingerling potatoes?
A: The best time to plant fingerling potatoes is in early spring, after the last frost.
Q: What are the ideal soil conditions for growing fingerling potatoes?
A: Fingerling potatoes grow best in well-drained, sandy loam soil that is rich in organic matter.
Hello, I'm Katie Owen! I am the voice behind "plantandseedguide," inviting you on a journey through the enchanting world of greenery. The magical beauty of nature and the fascinating realm of plants have always captivated me, leading me to this space.
href="https://plantandseedguide.com/advices-tips/why-are-the-tips-of-my-snake-plant-turning-brown-2/">Why Are the Tips of My Snake Plant Turning Brown - January 25, 2025