Skip to content

How to Plant Bare Root Daylilies A Step-by-Step Guide

How to Plant Bare Root Daylilies a Step by Step Guide

Bare root daylilies are daylilies that have been dug up and sold without their roots in the soil. This is done to make them easier to transport and store. Bare root daylilies can be planted in the spring or fall.

How to Plant Bare Root Daylilies

To plant bare root daylilies, you will need the following materials:

  • Bare root daylilies
  • Dig a hole that is twice the width and depth of the root ball
  • Compost or potting soil
  • Water

Instructions for planting bare root daylilies:

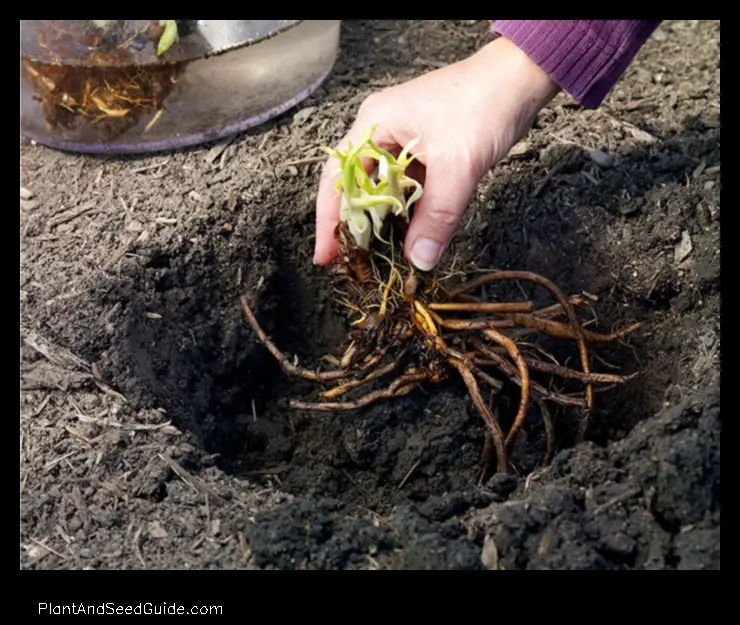
  1. Prepare the soil by digging a hole that is twice the width and depth of the root ball.
  2. Add compost or potting soil to the bottom of the hole.
  3. Place the bare root daylily in the hole so that the roots are spread out.
  4. Cover the roots with soil and tamp it down firmly.
  5. Water the daylily thoroughly.

Bare root daylilies should be watered regularly, especially during the first few weeks after planting. They should also be fertilized once a month with a balanced fertilizer.

how to plant bare root daylilies

Bare root daylilies will bloom in the summer. They will continue to bloom for several years if they are properly cared for.

TopicAnswer
DaylilyA herbaceous perennial plant with showy flowers
PlantingPlant bare root daylilies in the spring or fall
Bare rootDaylilies that are sold without their roots attached
PerennialA plant that lives for more than two years
FlowerThe colorful, showy part of a plant that attracts pollinators
how to plant bare root daylilies

What are bare root daylilies?

Bare root daylilies are daylilies that have been dug up and sold without any soil around the roots.

This is done in the fall, after the daylilies have finished blooming..

Bare root daylilies are often less expensive than potted daylilies, and they are also easier to transplant. However, they do require more care in the early stages of growth.

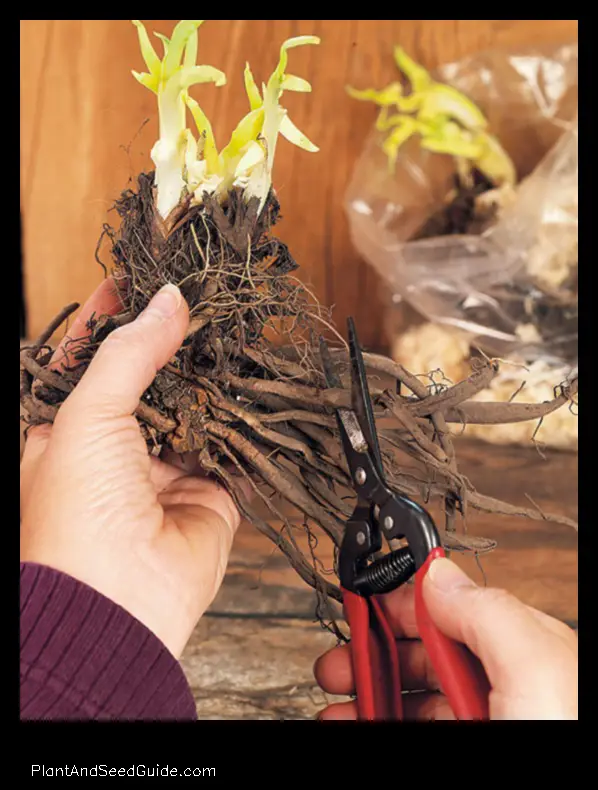
Bare root daylilies are available in a variety of colors, including white, yellow, orange, pink, and red. They can also be found in a variety of sizes, from small to large. When choosing bare root daylilies, it is important to select plants that are healthy and vigorous. The roots should be white and firm, and the leaves should be green and free of pests or diseases.

Loading... Seconds Left for
Miniature Orchid Terrarium Gallery!
Miniature Orchid Terarium Gallery Png

Bare root daylilies can be planted in the spring or fall. If you are planting them in the spring, it is important to wait until the soil has warmed up to at least 60 degrees Fahrenheit. If you are planting them in the fall, it is important to plant them before the ground freezes.

See also
How to Grow Farmers Delight Rice A Step-by-Step Guide! | 2024

When to plant bare root daylilies

The best time to plant bare root daylilies is in the spring, after the last frost. However, you can also plant them in the fall, as long as the ground is not frozen.

When planting bare root daylilies, it is important to choose a site that receives full sun and has well-drained soil. Daylilies are not tolerant of wet soil, so it is important to make sure that the area you choose is not prone to flooding.

To plant bare root daylilies, dig a hole that is twice the width and depth of the root ball. Place the root ball in the hole and fill it with soil, tamping it down firmly. Water the daylilies well after planting.

how to plant bare root daylilies

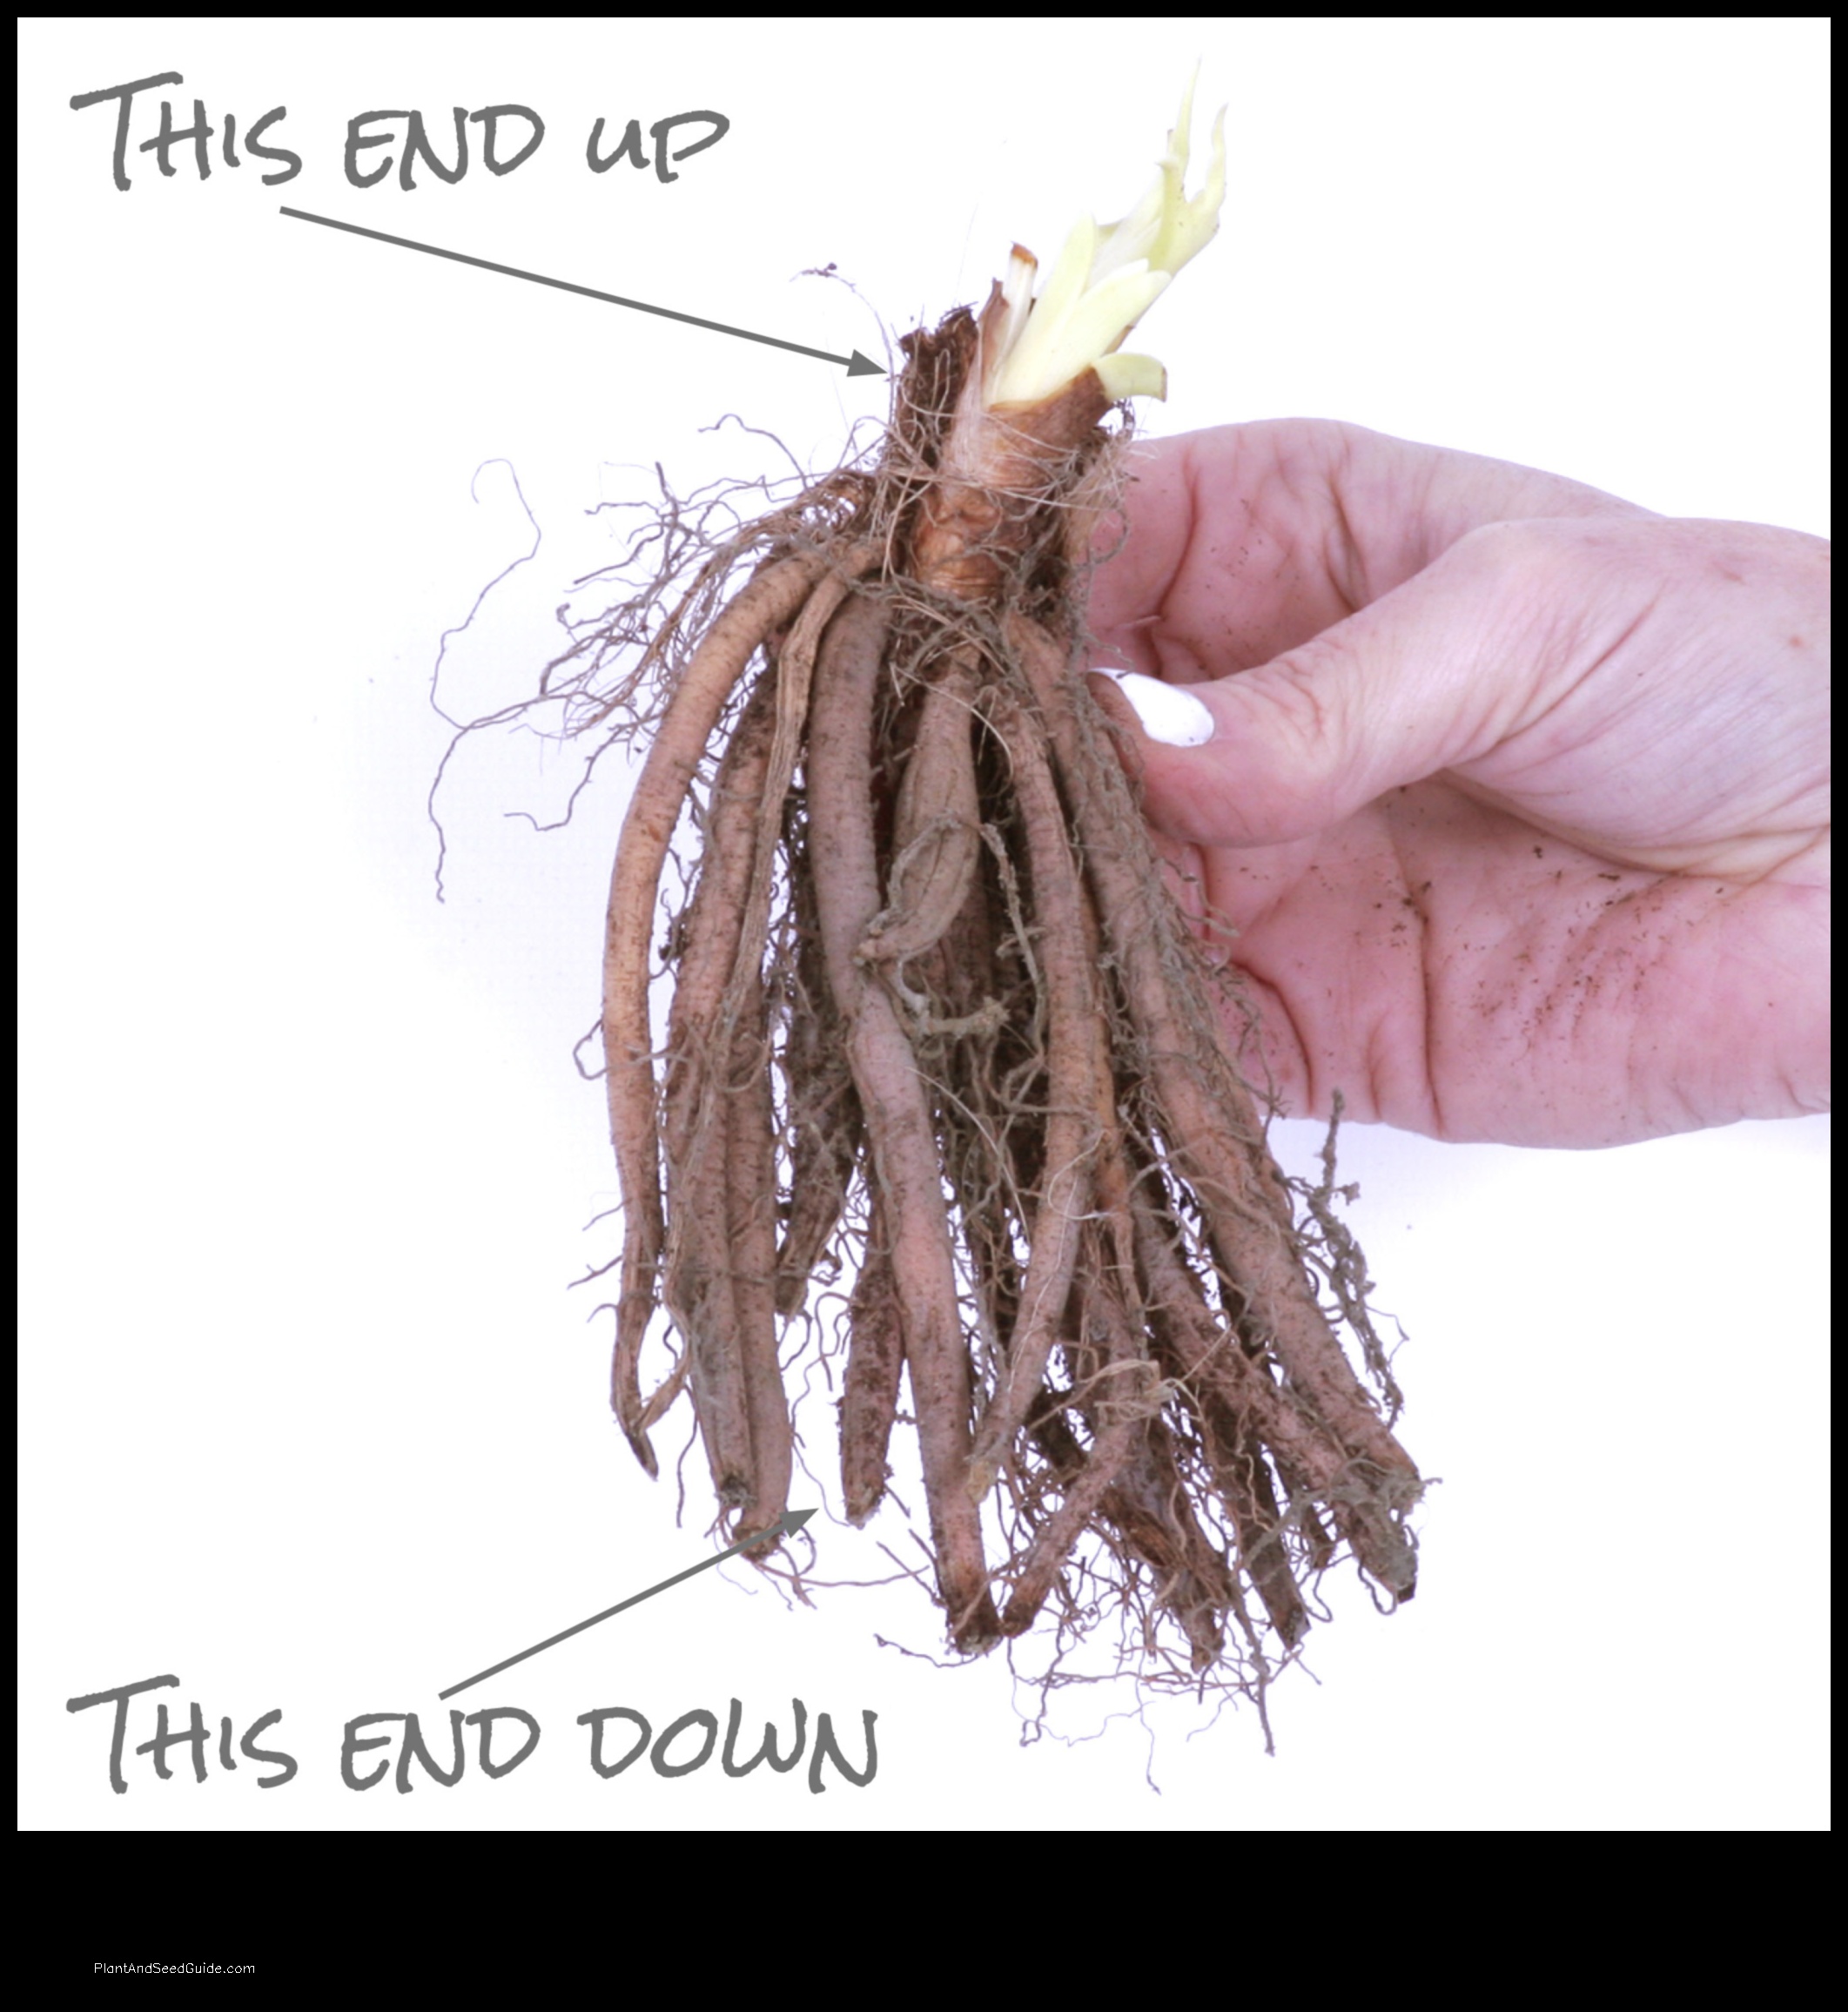
Where to plant bare root daylilies

Bare root daylilies can be planted in a variety of locations, but the best place for them will depend on the climate and soil conditions in your area.

If you live in a warm climate, you can plant bare root daylilies in full sun. However, if you live in a cooler climate, you may want to plant them in partial shade.

Did You See These?
Clickable Image

Daylilies prefer well-drained soil that is rich in organic matter. If your soil is clayey or poorly drained, you may need to add sand or compost to improve drainage.

Daylilies are also drought-tolerant plants, but they will do best if they are watered regularly during dry periods.

Once you have chosen a suitable location for your bare root daylilies, you can begin planting them.

To plant a bare root daylily, dig a hole that is twice the diameter of the root ball.

Place the root ball in the hole and fill it with soil.

Water the plant well and mulch around the base to help retain moisture.

Your bare root daylilies should begin to sprout new growth within a few weeks.

How to plant bare root daylilies

To plant bare root daylilies, follow these steps:

  1. Choose a sunny location with well-drained soil.
  2. Dig a hole that is twice the diameter of the root ball.
  3. Place the root ball in the hole and fill it with soil.
  4. Water the plant thoroughly.
  5. Mulch around the plant to help retain moisture.

Bare root daylilies should be planted in the spring or fall. They will need to be watered regularly, especially during dry periods. Mulching around the plant will help to keep the soil moist and cool.

See also
How to Save a Broken Tomato Plant A Step-by-Step Guide

Bare root daylilies can be propagated by dividing the clumps in the spring or fall. To divide a clump, carefully dig up the plant and gently separate the roots into two or more sections. Replant the divisions in a sunny location with well-drained soil.

Bare root daylilies are relatively pest– and disease-free. However, they can be susceptible to aphids, borers, and powdery mildew. If you notice any pests or diseases on your plants, treat them according to the directions on the product label.

Watering bare root daylilies

Bare root daylilies need to be watered regularly, especially in the early stages of growth. Water them deeply once a week, making sure to soak the roots thoroughly. As the plants mature, you can gradually reduce the amount of water you give them. However, it is important to keep the soil moist at all times, as daylilies will not tolerate drought conditions.

If you live in an area with hot, dry summers, you may need to water your daylilies more frequently. In general, it is better to err on the side of overwatering than underwatering, as daylilies are more likely to suffer damage from drought than from overwatering.

You can also help to keep your daylilies hydrated by mulching the soil around them. Mulch helps to retain moisture in the soil and prevents the roots from drying out.

Did You See These?
Clickable Image

Pests and diseases of bare root daylilies

Bare root daylilies are susceptible to a variety of pests and diseases, including:

  • Aphids
  • Thrips
  • Spider mites
  • Mealybugs
  • Fungus gnats
  • Powdery mildew
  • Rust
  • Botrytis blight
  • Damping off

To prevent pests and diseases from affecting your bare root daylilies, you can take the following steps:

  • Inspect your plants regularly for signs of pests or diseases.
  • Remove any infected plants immediately.
  • Practice good garden hygiene, such as cleaning your tools and pots before and after use.
  • Water your plants at the base, avoiding getting the leaves wet.
  • Fertilize your plants according to the package directions.
  • If you see signs of pests or diseases, treat your plants with an appropriate insecticide or fungicide.

By following these tips, you can help keep your bare root daylilies healthy and pest-free.Pests and diseases of bare root daylilies

Bare root daylilies are susceptible to a variety of pests and diseases, including:

  • Aphids
  • Thrips
  • Flea beetles
  • Slugs
  • Snails
  • Rust
  • Powdery mildew
  • Downy mildew

To prevent pests and diseases from damaging your bare root daylilies, you can take the following steps:

  • Inspect your plants regularly for signs of pests or diseases.
  • Remove any infected plants immediately.
  • Prune away any dead or diseased leaves or stems.
  • Water your plants regularly to help keep them healthy.
  • Fertilize your plants according to the package directions.
  • Apply a fungicide or insecticide to your plants as needed.
See also
Growing Fruit Trees and Vegetables in Air Pruning Pots

If you suspect that your bare root daylilies have a pest or disease, you can contact your local nursery or garden center for advice on how to treat them.

Troubleshooting bare root daylilies

If your bare root daylilies are not doing well, there are a few things you can check for.

First, make sure that you have planted them in the right location. Daylilies need full sun and well-drained soil. If they are planted in too much shade or in soil that is too wet, they will not thrive.

Second, check the watering schedule. Daylilies need to be watered regularly, but they should not be allowed to sit in waterlogged soil. Water them deeply once a week, and then let the soil dry out slightly before watering again.

Third, check for pests and diseases. Daylilies can be susceptible to a variety of pests and diseases, including aphids, mites, and powdery mildew. If you suspect that your daylilies are infested with pests or diseases, treat them with the appropriate insecticide or fungicide.

Finally, if you have checked all of these things and your daylilies are still not doing well, you may need to transplant them.

Daylilies can sometimes become rootbound, which can stunt their growth and cause them to decline..

If you think that your daylilies are rootbound, carefully dig them up and replant them in a larger pot or garden bed.

FAQ

Q: What is the best time to plant bare root daylilies?

A: The best time to plant bare root daylilies is in the spring, after the last frost.

Q: How deep should I plant bare root daylilies?

A: Bare root daylilies should be planted so that the crown of the plant is level with the soil surface.

Q: How much water do bare root daylilies need?

A: Bare root daylilies need to be watered regularly, especially during the first few weeks after planting.

Katie Owen
Follow Me

Leave a Reply

Your email address will not be published. Required fields are marked *